About Me

My photo
I am a stay-at-home mom. I have been married to my handsome and wonderful husband for over 14 years. Right now he's battling stomach/esophagus cancer. So I do my best to craft when I can. I have two wonderful boys. My oldest, Garett, is 24 and served 5 years in the Navy. He's been home since the beginning of the year (2014). We are very proud of him. My youngest, "DJ", is 13 and in the 8th grade. I have two Border Collie mix dogs (Koda and Rugu), one Calico cat (Hydie), one orange Tabby cat (Bosley), one Tea Cup Chihuahua (Gigi...I LOVE her sooo much), a Chiweinnie (Lily....sweetest dog ever), and a Jack Russell/Chihuahua (Connor....AAALL boy).

Saturday, March 26, 2011

EASTER BASKET BLOG HOP


Happy Spring everyone!  Thanks for stopping by.  If you are here from Erika's then you are on the right track.

The project that I created is a cute little picture/scrapbook album that will fit just right in an Easter basket!  And it's perfect for ANY age.


Now...I had an album all finished and each page was completely decorated and ready for photos to be added...but I cannot find it ANYWHERE and it's really frustrating me. So I quickly whipped up another one to use until I can find my original one.


Supplies used and basic instructions: The album cover and pages are from the original Sizzix. The album cover is from a thick chipboard.  The pages I used regular white cardstock.  I lightly inked the edges. Next I cut out the daisy flowers with my Sizzix Sizzlits. I also used the original Sizzix hinges die cut.  The album cover die places and score line towards the edge of the album, so what I did was cut down the line and then placed the hinges there so that the album can open better and flat (I won't be showing the pages from THIS album...lol...because they are blank, but hopefully I will find my original one). Next I placed a "best friends" sticker on plain cardstock, cut it out, then placed it on a vellum tag with foam tape to raise it up a little. I layered the flowers and I even used the negative of one of the flowers and cut really close. The flowers didn't have anything in the center so I used a couple of rhinestones for the centers. Then I adhered the flowers to the book. You can bind the album with ribbon, binding rings, brads, or even screw posts. The possibilities are endless and left only to the limits of your imagination.  Another great idea is to insert a lot of pages to be used as a sketch album, autograph book, or even recipes.

I have some blog candy for one lucky winner but it's going to be a surprise...but I'm sure you will really like it...
at least I hope you will :)

To win...you must first follow my blog.  Then leave me a comment and a way to contact you.

Since I'm the last one on the blog list....YOU'RE DONE!  I hope you had fun and got some great ideas.

But here is the list in case you got lost or jumped into the hop starting from me.  If that's the case, you will want to start at Joy's Blog which you will find at the top of the list.  Thanks again for looking and have a great day/weekend!


Sheryl - http://igottacraft.blogspot.com/  <~You Are Here


Monday, March 21, 2011

**WINNER** of the Bunny Hop Blog Hop **WINNER**

First of all...I wanted to express my sincere thanks to EVERYONE that came by to see my project...AND for all the wonderful comments left.  I read every single one of them :)


I had a lot of fun creating this tag and I had a lot of fun visiting other crafty blogs! Everyone did such a great job creating such cute Easter/Spring items.


Now...for the winner!  And the winner of my drawing for Blog Candy is (envelope please.......) #21...Suzy! Suzy said..."I'm loving the bunny projects!! What a fun hop. Thanks for the chance to win :)"


Congratulations Suzy! Speech!  Speech!!! 

Saturday, March 19, 2011

The Bunny Hop blog hop!!

To start at the beginning...click HERE


Hey everyone!  Thanks for stopping by.  If you are here from Kimberly's Blog Site then you are on the right track.

My project that I created is a tag that you can attach to an Easter basket or gift...or wherever you think would need that PERFECT touch!


Supplies used and basic instructions: Tim Holtz Tag and Bookplates Die from Sizzix to cut out the tag, then I covered the tag with the print paper from Wilton (see picture below of paper). I sanded the edges and lightly sanded the center. Next I cut out a tag using the Cricut Tags, Bags, Boxes & More. I used my Gypsy to make the tag the right size to fit the stamp phrase. Then I used Cricut Simply Charmed for the chicks. I designed the chicks on my Gypsy so that they were 2 inches tall. I stamped my phrase on the tag using Joy's Life stamps (see picture below with a link to Joy's site). In the holes of the tag, I placed two flower brads. I cut out the "chick" letters from a sticker set and adhered them to chipboard and cut them out. I used foam tape to give the letters a lift. I assembled the chicks and adhered them in place with foam tape. One of the felt flowers didn't have anything in the center so I used a Twinkle Jewel for the center (see picture below for a link to web site). Then I adhered the flowers to the tag. I cut the bakers twine (that I got from The Twineryall the same size and threaded it through the hole of the tag. Before I tightened it up, I threaded bunched up tulle (lavender and yellow) through the twine.  I added a little scrap flower as a charm.


Crafter's Square
Flower & Lace Trim
from Dollar Tree
Wiltons Memories
of the Heart
Scrapbook Paper
Stamps used are
from Joys Life.
She has several styles.
The one I used is
 Yummy Pun Stamps
I used a Twinkle Jewel

And that's how my tag was made :)  Thank you for stopping by.  But before you leave, I have a nice little giveaway (!!!!!BLOG CANDY!!!!!).  To be eligible, you must first follow my blog and then leave me a message with a way to contact you.  I will announce the winner on Monday afternoonish.  The winner will receive everything that is in the pictures below, including the items needed to make the same tag (minus the word "Chick" because I don't have any of those stickers and different brads)!!
Die Cuts With A View Metallic Accents, 
Tag set, Brass tag lines from
Karen Foster - Summer theme


This is the tag set opened. You get
6 yards of bakers twine (total)!!! YAY!


After that, you will want to hop on over to 
Deborah's Blog.  Have fun and have a great weekend!!


Here is the list in case you get lost:
Michelle  - http://queenofmycraftroom.blogspot.com/
Susan - 
http://itsmesusanp.blogspot.com/
Carol - 
http://cardstockscissorsandglue.blogspot.com/
Mary - http://cardztv.blogspot.com/

Kimberly - http://hellocutiecrafts.blogspot.com/
Sheryl - 
http://igottacraft.blogspot.com/<--YOU ARE HERE
Deborah - 
http://www.scrappingmamma.net/<--Go here Next
Bonnie - 
http://ascrapabove.blogspot.com/
Dianne - 
http://diannesscrappycreations.blogspot.com/
Cheryl - 
http://cardsbycg.blogspot.com/

Lisa - http://handmadewithlove-lisa.blogspot.com/
Misty - http://abusyplace.blogspot.com/
Debbie - 
http://craftydeb-ddscrafts.blogspot.com/
Linda - http://lindascreativity.blogspot.com

Patti - http://www.pattilynncreations.blogspot.com/
Nicolette - http://beyondscrapin.blogpot.com/
Martha -  http://pattisscrapingtime.blogspot.com/
Rhondahttp://craftingwithblue.blogspot.com/

Saturday, March 5, 2011

Some Altered Items


 This was a NicoDerm Box. It had a front flap that was perfect as a "card" ON the gift box. (5 years smoke free...by the way :)


Some Quilled Creations


Sunday, February 27, 2011

Baby Album bound with Cinch

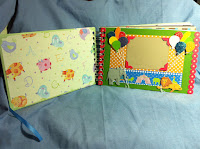
The cover was made with the chipboard that was supplied with the Cinch machine.  I painted some wood letters to kinda match the blue in the paper.  The paper was part of a set that I got from The Dollar Tree. I glued the giraffe section of the paper to chipboard then cut out the giraffe.  The frame I purchased from The Dollar Tree as well.  They came in a package 6...PERFECT for scrapbooking, card making, albums, etc.  The edges of the album, I punched a hole matched up to a "tag brad" from Art Accentz Bradletz. 
  The inside cover was paper used from the same set as the giraffe.  I used the Martha Stewart Corner Punch to accent the corners for a cleaner look.

The animals and balloons were cut from Sizzix Sizzlits.  The scalloped edges of the pages were cut from Sizzix Decorative Strip Ribbons.

 ***********************************************


Embossing Folder used was Sizzix Textured Impressions Hello Kitty Spring set.  The phrase was from the Sizzix Textured Impressions Baby set. I used Offray sheer polka dot ribbon, buttons to match the theme, and I think the diaper pin accents are from Stand-Outs...but I'm not sure.

 ***********************************************


The paper and the accents are from a Boys set from All My Memories, Studio Collection Boys Theme.

 ***********************************************


The Underwater page is made from DCWV All About Boys set. The sun, some rocks, and seaweed was cut from Sizzix Sizzlits.

The duck was cut from Sizzix Big Shot, the bathtub from Sizzix Originals, the "splish splash", shampoo, and toy boat was cut from Cricut Cartridges.  For the towel, I just cut a piece from a scrap towel that I have.  The embossed paper was from Sizzix Textured Impression Winter set.

 ***********************************************


These pages were fun to make!  I used plain brown paper for the background.  The small animals were cut out with the Sizzix Sizzlits Stuffed Animals set. The big teddy bear was cut out using Sizzix Originals. I applied flocking to the teddy bear to give him a fuzzy feeling. I also tied a thin ribbon around his neck.  The cork stickers are the baby collection from Karen Foster. 

***********************************************


The cowboy page was created using DCWV All About Boys for the background paper.  The accents used were Sizzix Sizzlits Cowboy set.  For the race car page I used Sizzix Sizzlits Decorative strip City Scape and the race car set.  I made my own street with black paper and cut strips of yellow paper.   

***********************************************


AND finally...the last page was pretty fun to do.  Since this was a prehistoric theme....I had to do most of the page "prehistorically".  The mountains, palm trees, and rocks were created by tearing the papers and crinkling some up.  The ground (or gravel) was made from the residuals of a border punch that I used once. And lastly...the dinosaurs and sun were cut from the Sizzix Sizzlits.  

This entire album was made from using mostly Sizzix for a few reason:
1. Because I needed more desk space, so I had to move my Cricut machine.
2. Because I have more of a variety of "boy" things with my Sizzix than I do with my Cricut.
and...
3. Because I haven't used my Sizzix in so long...it was time to show them I still love them and always will.

Now...for the album basics....

I measured the Album front and back cover to be 5 3/4 x 8 1/2. I used the sturdy chipboard that came with my Cinch Binding machine.  The pages I cut just a little smaller than the cover.  I set my Cinch according to the directions and cut and bounded the album.

*NOTE:  When creating individual pages, make sure you leave enough space on the end of your project for binding.  Thank you for looking :)

Friday, February 25, 2011

St. Patrick's Day greeting card w/ matching tag

I must say that I am very happy with my GREEN creations. The whole time I crafted these, I had the tune to the Irish Drinking Song in my head (from Whose Line is it Anyway?) I will describe what and how I made the card below:


Embossed card front with Sizzix "Winter" set embossing folder.  I used the Sizzix Texture Botique.  I ABSOLUTELY love it!

 Ink supplies: Green Rubber Stampede Dye Ink, Tattered Angles Bazzill Parakeet, Studio G Shimmer Green Pigment Ink.


First I ran stamp ink across the embossed dots on the card front gently.  After that I lightly misted with the Tattered Angle's spray. I placed a glue dot on the card in the desired location. I attached the ends of the glittered spray to the glue dots. Some sprays I left straight and the other I curved around to meet the other end to the glue dot.  Oh...I also tore the edge to the card front  because it looked better than leaving a blank edge without embossing.

Next I'm getting out my tin of paper flowers and getting the two sizes of GREEN.  This little beauties came inside a scrapbooking bag kit filled with all sorts of goodies that I got from the Sams Club auction site.


Next I'm using my largest rhinestone brad that I can find... 


And placing it through the center of the flower.


Now for my pretty Kiwi Sheer Dot ribbon by Offray (duh).

Tying it in a nice loose knot and snipping the ends as shown.

Next I place a glue dot on the other side of the knot and place it as shown.  Oops...I skipped a step.  Take a length of the ribbon and have it go across the card.  Then place the bow, then the flower with some silk leaves...also using glue dots.


Ok...next I got carried away with my card and ended up putting it all together without taking individual pictures...but here is a package of stamps I use for the ticket with the phrase in the center.  They are "Paperwork Greetings" by Inkadinkadoo.


These two packages of stamps are GREAT. I stamped these images on white cardstock using the shimmer green ink and a lighter green Fluid Chalk.


Now...for my ultimate favorite item right now...my Peapod Bakers Twine from The Twinery.  I love this stuff.  I also have it in Maraschino (Red).

Ok....so as you can see from the assembled card...I stamped the ticket on a tan cardstock. The ink I used for that was Archival Pigment Graphite Black from Tsukineko. Then I cut out the the stamped images.  I used scalloped deco scissors around the "Everyone's Irish for a Day" then inked the edges with the darker green ink.  Then I used a Fiskars circle punch around the other image.  The Shamrocks were cut out using the Cricut Paperdoll Dressup cartridge and the Imagine Country Carnival cartridge.  I did two sizes...one for the card and a smaller one for the tag.  Then I used green and tan fibers for the top of the tag.  And there you have it.  My card and tag set...currently for sale on my eBay site.

Thank you for taking a look at my card/tag set!  Have a great weekend.